It is a simple and very old tool used for making sails. Claudio Diolaiti of A.MO.N. R/C Yacht Club, Milano Italy, reintroduced the idea on http://www.nonsolovele.com and other forums after coming across a very old article on the subject. Claudio’s research suggests that this method was historically used to manufacture sails for fishing boats in the north of France and possibly the south of England.
The appeal of the gadget is that the tool allows for repeatable, high-quality results from a small, easy to make tool. The gadget works by forcing a flat panel line into a curve, which is then affixed to a straight edge on the next panel. This is also how large paneled sails are sewn together in a sail loft to create the desired shape. As you will see in the article’s photos, the first panel is forced into a curve that moves the outside edges of the seam toward the next panel while holding the middle secure. Once the second panel is attached to the first, the two panels are released from the gadget. The result is that the vertical length of the two panels is greater in the middle than on the edges. The extra length forces the sailcloth to arc out of the flat X-Y plane, and that curvature creates the camber in the sail. If care is taken to position the panels with the max draft position at the center of the arc on the gadget, the draft will be where you wish it to be.
Experiment with making the sails, and see what you like. As a place to start, here are some recommendations.
A good range for maximum draft is from 35% to 45% back from the luff of the sail – try 40%.
The percentage draft is greatest at the top of the sail. The curved foot will add draft low on the sail, which dissipates as you move upward. For a three-seam mainsail, I would suggest starting with a 10% draft in the top seam, 8% in the middle seam, and 6% in the bottom seam. For a two-seam jib, start with 8% in the top seam and 6% in the bottom seam.
Luff curve should be added to both sails. For the main, start with a max curve equal to the average diameter of the mast. For the jib, use half that measurement.
Sail design is an entirely separate topic, and it is far more complicated than the subject of this article. I wanted to give you some safe starting points from which you can work. These basic parameters work nicely. You will be able to do better with some experimentation, but starting here will not disappoint.
Repeatable results come from keeping notes on the percentage draft that you build into each seam. Also, note the position of max draft as measured from the luff. When you hit on a good combination, you can make an identical sail whenever you wish. The sails made with the gadget are fast, look great, are easy to make.
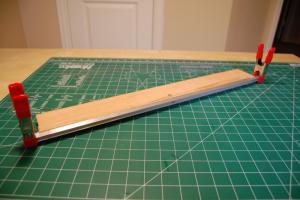
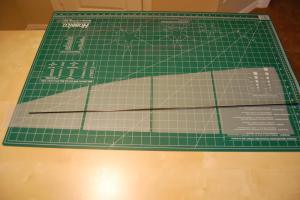
Making the Gadget
|
This is the completed gadget. It is constructed from a 3/4” oak board that is 2 ½” wide and 24” long. The aluminum” channel is ½” by 3/8”, and the “L” brackets are ¾” by ¾”. Three wood screws are needed for the assembly. All photos by Eric Rosenbaum.
|
|
|
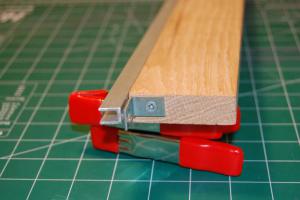
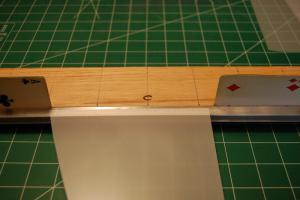
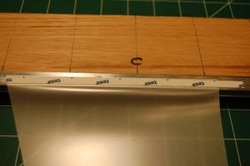
The “L” brackets are mounted at the ends and allow the spring clamps to hold the bar flat to the wood base.
|
|
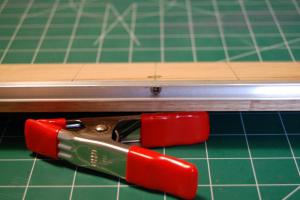
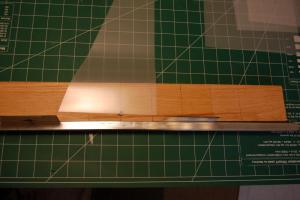
The aluminum “U” channel is connected by a single screw in the middle of the gadget. The channel should be mounted even with the top edge of the wood. Draw a centerline on the wood that aligns with the screw. Additional lines can be added for estimating seam length, but they are not needed. The aluminum “U” shaped channel can be replaced by a ½” by ½” solid acrylic (Plexiglas) square rod. The acrylic will be easier to bend than the aluminum.
|
|
Making the Sail
Using the gadget to make a sail is straightforward, but the steps must be completed in the correct order. Start with a scale drawing of the sail, which includes the seam locations, maximum draft position, and measurements of the seam lengths.
Using the gadget to make a sail is straightforward, but the steps must be completed in the correct order. Start with a scale drawing of the sail, which includes the seam locations, maximum draft position, and measurements of the seam lengths.
|
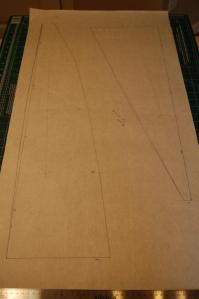
This is a conventional B rig plan for the RG65. It is drawn full-scale on butcher paper, and it has lines for the seams and max draft position. Cover the plan with the sailcloth, and roughly trace the pattern – about 2” oversized in all directions. Cut on the rough outline. The sailcloth used here is 1.4mil Mylar, but coated 3/4 ounce rip-stop nylon and other low-stretch films can be used as well. Rip-stop nylon is supplied by sailmakers and kite supply stores. The Mylar is a bit more difficult to find in light enough weights, but it can be secured at McMaster-Carr.com or PJSails.co.uk – Google is helpful to find other retailers. As for weight, the Mylar film (PET polyester film) should be 1mil (0.001”) for very light sails, 1.4 or 1.5mil for standard duty sails, and 2.0mil for high-wind sails. Anything thicker than 2.0mil is too heavy for the RG65.
|
|
|
The seams were drawn in place and the max draft positions marked with 5mm crossing lines. Max draft is highlighted in the photo with a CF rod placed on the desired location. The panels were cut apart using a steel ruler and a #11 Exacto. The seam overlap will shorten the spacing between the design seam locations, so adjust the cloth when drawing the seams to counter this problem. Draw the lowest seam first and mark the max draft location. Then, slide the sail away from the next seam keeping the traced line parallel to the line on the plan. The distance between the plan line and the traced line should be equal to the seam width, which depends on the seam tape used. Repeat the drawing and sliding process for each seam.
|
|
Claudio presented a graph to help a sailmaker decide how much to curve the bar on the gadget to get a desired amount of draft. I prefer tables, and so I came up with an Excel spreadsheet that will tell you how many shims you need to get a certain percentage draft on a seam from 50-360mm wide. The spreadsheet will be saved on the RG65 Class site as well as on the RG65 Yahoo Group page. All you need to do is get a supply of shims, count them and measure the thickness of the stack. Enter those two numbers in the red highlighted cells. The number of shims needed for each side of the gadget is equal to the number in the cell that intersects the seam width with the desired draft. If the actual seam is 210mm wide and you want 8% max draft, then a stack of six shims are placed between the oak and the bar at a position 10-15mm outside the finished seam length. Thinner shims increase the accuracy of the results, but they will be difficult to work with if they are too thin.
|

| ||||||

|
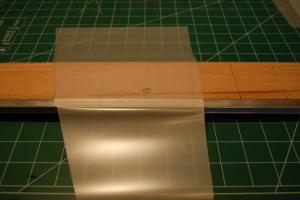
I always work with the sail’s luff to my right. Starting with the top piece of the sail, place it on the tool as shown. The max draft position is aligned with the center mark of the tool. The bar is held horizontal and flat to the oak with spring clamps. Place a piece of double-sided tape approximately 2mm back from the near edge of the bar, and make it longer than the sail piece by 20mm or so on each side. Remove the protective paper layer from tape. I buy the ¼” seam tape from Goodwindskites.com or 6mm tape from SailsEtc.com. Unlike the tape used when making sails on a sail block, this tape is not heat-setting.
|
|
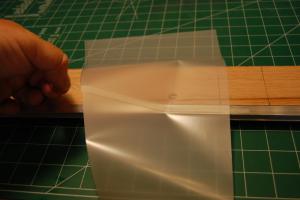
Remove the clamps and curve the bar using the shims. I am using playing cards. The shims should be slid into a position 10-15mm outside the finished width of the seam.
|
|
|
Flip the cloth toward you, align the max draft to the center mark on the gadget, hold the panel edge just above the tape, and then place the sail cloth on the tape so that it covers the tape by 1-2mm. Burnish in place with your fingertip.
|
|
Straighten the bar by removing the shims, and then replace the clamps. The panel has been curved, and the bubble in the cloth just next to the bar indicates the eventual draft that will be in the seam. Add another piece of seam tape. Make sure that the left side of new tape does not adhere to the old tape; otherwise it will be difficult to remove the first strip of tape. The new tape should be close to the sail cloth edge. Do not pull the tape when laying it down. It is somewhat elastic, and stretching it will cause puckers later once the seam has been released from the gadget
|
|
|
Remove the paper from the tape, and then place the next piece of the sail down on the tape. Remember, the luff is to the right. Align the center mark with the max draft mark, let the cloth cover the tape and extend past the edge by 1-2mm, and gently let the cloth down onto the tape. Burnish the seam with your finger.
|
|
Remove the seam from the gadget by gently pulling on the tape extending on the left. Take care not to wrinkle the cloth if using Mylar. Flip the sail segment over, and then remove the first piece of tape that secured the seam to the bar. Sometimes, the sacrificial tape will leave a bit of adhesive residue on the sail. To remove it, take a few inches of sail tape and roll it into a ball. Then while holding the sail from moving, roll the ball back and forth over the residue – it will lift the adhesive off the sail cloth.
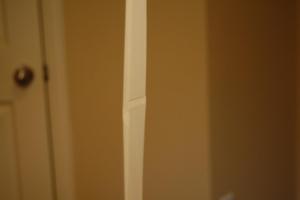
Hold the sail up by the top and admire the smoothly arced seam with built in draft! Repeat for each seam until the sail is complete.
|
|
|
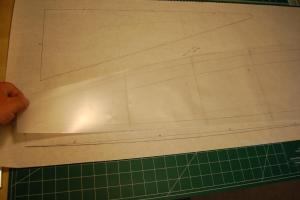
Once the sail panels are all seamed together, lay the sail back on the drawing aligning the seams and the max draft points to the drawing. Tape the sail to the drawing with low-stick masking tape, and then trace the actual finished dimensions using a pencil. I use a flexible ruler and a straightedge to keep the tracing accurate.
|
|
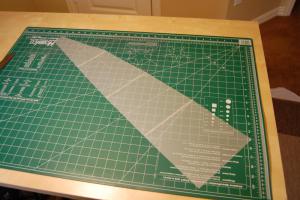
Cut on the lines using a #11 Exacto. For straight lines, the steel ruler ensures a good cut. For curves, you will need to freehand the cut. Practice on some scrap material until you are comfortable. Tip: do not stop cutting unless you are on a seam or have passed the end of the cut. A stop/start in the middle of a panel will likely lead to a tear when sailing. Use a new blade as dull blades will pucker the cloth.
|
|
|
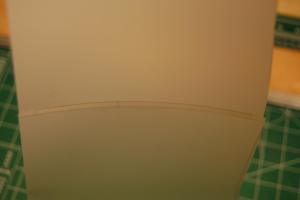
The seam with built in camber.
|
Here is another view of a sail seam.
|
Claudio’s gadget is easy to use and allows us to make very nice sails. Your first few seams may not be perfect, but the learning curve is short. I practiced using typing paper; it is very unforgiving because it will not stretch. Very quickly, you will produce sails that you can be proud to use. Give it a try!
We are very pleased to assist the sharing of this knowledge. Our big thanks to Eric Rosenbaum.
I make my sails with this gadget and really with time the sails are very good.
We are very pleased to assist the sharing of this knowledge. Our big thanks to Eric Rosenbaum.
I make my sails with this gadget and really with time the sails are very good.